Painting Anime Eyes in IbisPaint X: A Step-by-Step Guide by Phery_51
- Jerica Cate Gil Dumadag
- Oct 23, 2021
- 3 min read

by Jerica Cate Gil Dumadag
Art serves as a form of expression in which emotions and hidden meanings are conveyed from a visual image. Nowadays, it is perceived through the Internet. People tend to choose their own various art styles and techniques that either come from inspiration from numerous talented artists' work, carry out particular styles of art, or more.
Japanese animation called ''Anime'' is prevalent and gives emphasis to viewers. The audience caught the attention of the outstanding and elegant visuals. There is an incentive for the audience to draw illustrations in anime styles. Artists gain experience and knowledge through tutorials and guides to improve their skills and use new techniques for their artworks.
Hi, I am Jerica also known by my artist username Phery_51. I draw illustrations, particularly in anime style. You may learn something as I disseminate my techniques used in painting anime eyes, interpret the steps thoroughly, and indicate suggestions along the way. Some steps can bewilder you if you're new to digital art for I suggest watching these videos as it is essential in digital painting.
How to use Blend Mode by Ibispaint X: https://youtu.be/u1SezieQOvY
How to use Clipping by Ibispaint X: https://youtu.be/OZNmq1uZaqM
The step-by-step guide will commence in this section:
Step 1: Base Color

Separate the base color of the eye and the sclera as eye layer and sclera layer. Start off with a plain base color. I recommend avoiding too saturated and dull colors.
Color Code:
Eye: # FAB834
Sclera: # EEE6DA
Step 2: Shading the Sclera

On the sclera layer, add a new layer and clip it. I add a lighter tone of red on the upper portion of the sclera then set the blending mode to Multiply.
Brush: Pen (Fade)
Color Code:
Sclera shade: # D3B9B6
Step 3: First Shading

On the eye layer, create a new layer and clip it. I often choose a color that has a lesser saturation and a lighter value than the base color. Analogous colors are used in cel-shading.
Brush: Clouds (rough)
Color Code:
1st shade: 8E5347
Step 4: Second Shading

On layer 2, repeat the process on layer 1 and choose a more saturated and darker color but set the blending mode to Multiply. Leave out empty space on the top center of the eye as it gives a small reflective surface. Most anime eyes on the shows contain a reflection of the eye.
An example of this is the eyes of Violet Evergardenfrom the animators of Kyoto Animation.
Brush: Clouds (rough)
Color Code:
2nd shade: # 321002
Step 5: Adding the Pupil

On layer 3, paint the pupils (a diamond-shaped pupil is my style but you can shape it from your preference).
Brush: Dip pen (bleed)
Color Code:
Pupil: # 1C0501
Step 6: Add lighting

Layer 4: I use the eyedropper tool and use the base color for the lighting. Set the blending mode to Add then paint the lighting on the bottom portion of the eye ( I also painted small lightings across the pupils for extra details).
Brush: Parilti (bosluk)
Color Code:
Sclera shade: # D4BBB7

Layer 5: Set the blending mode to Screen and you can pick a range of dull colors of brown for the second lighting.
Brush: Dip pen (bleed)
Color Code: # 764E41
Step 7: Saturation

Layer 6: Add saturation by picking a light value of orange and setting the blending mode to Overlay. Lower the opacity for your preferred result.
Color Code: # EF9951
Step 8: Additional value upon the Sclera

Layer 7: Set the blending mode to Linear Burn. I often pick light and dull colors ranging from blue to pinkish red from the color wheel.
Brush: Airbrush (Trapezoid 60%)
Color Code: # 84787D
Step 9: Blur along with the Iris

Either combine all the layers in a folder and press add layer from a folder or merge all of the layers (including the eye and sclera layer) then use the blur tool for a softer tone of the iris.
Step 10: Details on the Eyelashes
On the line art layer for the eyes: Create and clip a new layer Set the blending mode to lighten and pick any shades of red for airbrushing the tips of the eyelashes. Then create a new layer and set it to Add for the highlights of the lashes. Adjust the opacity to your preferred result.
Brush: Dip pen (bleed) and Airbrush (Normal)
Color Code: # 764E41
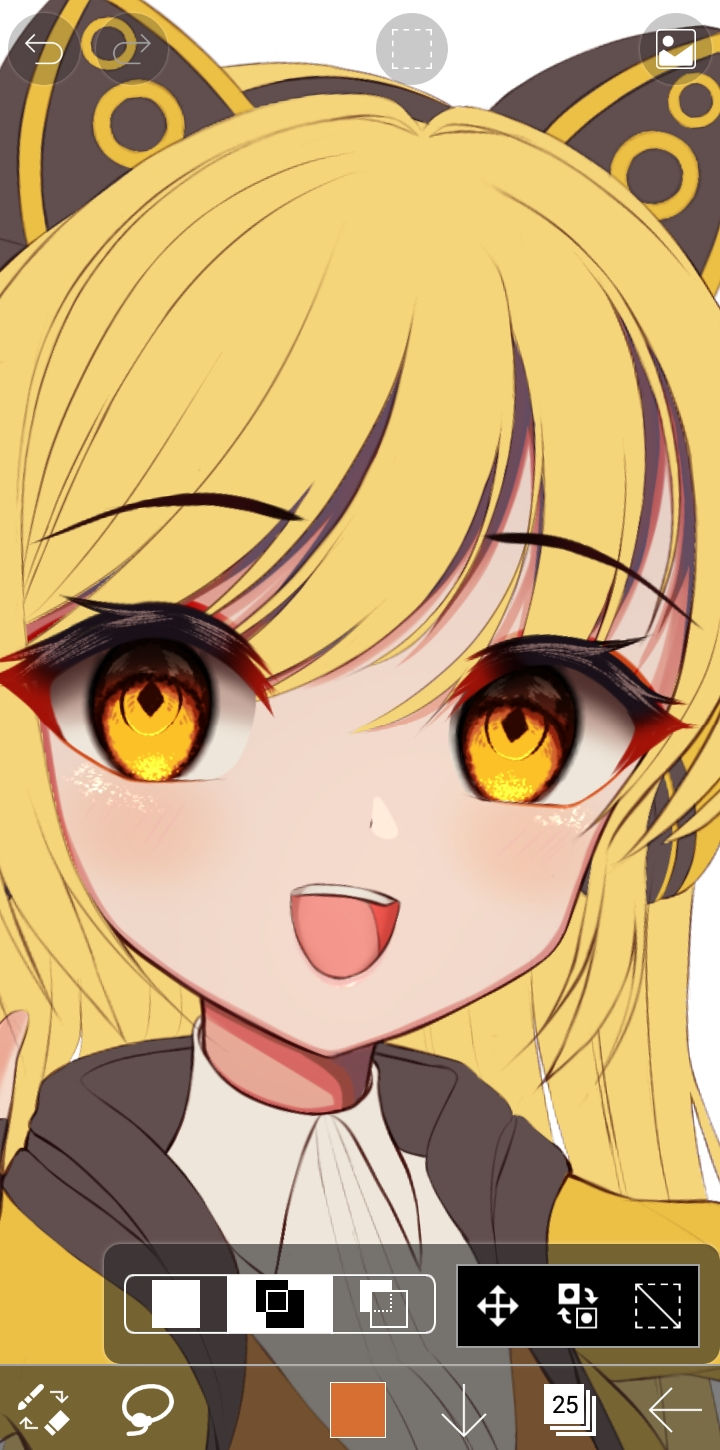
Step 11: Additional highlights

Create a new layer on top of the line art layer then set it to Add and paint the highlights ( with your preference and arrangement) using a white color.
Brush: Dip pen (soft)
The QR brushes that I've used for this guide are in this folder: https://drive.google.com/drive/folders/1K1DNVuh4lVwi8yq7sP3NzxzBT3djmOcs?usp=sharing


Comments